AutoCAD · Point Style · DDPTYPE
When you use the Divide or Measure command in AutoCAD, the software drops point markers along your geometry to mark the divisions.
“The default point is basically invisible. Change its shape and size, and your workflow gets a whole lot easier.”
The problem is AutoCAD’s default point style is a single-pixel dot — and against a drawing full of lines, it’s nearly impossible to see where those points actually landed. This quick guide shows you how to change both the shape and size of points so they’re clearly visible at a glance.
1. Open the Point Style Dialog (DDPTYPE)
Type DDPTYPE in the command line and press Enter. (In newer versions of AutoCAD, PTYPE works the same way.)
2. Choose a Shape and Set the Size
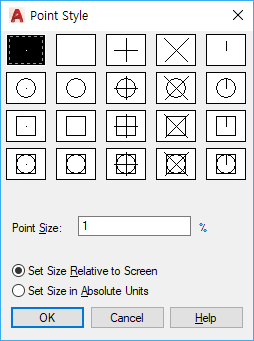
The Point Style dialog shows a grid of more than 20 different point shapes to choose from.
The filled dot in the top-left is the default — the tiny dot that’s so hard to see. The empty cell next to it hides points entirely. Click any shape to select it.
For most drafting work, the shapes that stand out best — even in dense drawings — are the X mark (row 1, fourth from left) and the circle with crosshairs (row 2, third from left). Both make it immediately obvious where each point is, regardless of what’s going on around it.
Once you’ve picked a shape, check the Point Size options just below:
- Set Size Relative to Screen: The point size is expressed as a percentage of the current viewport size. It scales automatically whenever you zoom in or out and regenerate the display (RE). A value around 5% tends to work well for most drawings.
- Set Size in Absolute Units: The point size is fixed in drawing units (e.g., mm). It stays the same physical size regardless of your zoom level — useful when you need consistent plotted output.
3. Apply and Use Node Snap
Click OK to close the dialog and apply the changes.
Back in your drawing, all the previously invisible dots will now appear in the new shape you selected — clear, visible, and easy to locate at any zoom level.
To take full advantage of this, enable Node in your Object Snap (Osnap) settings. With Node snap active, your cursor will lock onto point markers like a magnet — making it effortless to snap lines, arcs, or any other geometry exactly to your division points.